Barbecue Tool Cabinet
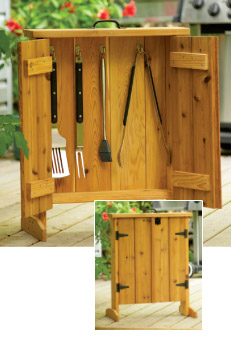
This cedar barbecue tool cabinet is an attractive and practical addition to your patio or deck.

This cedar barbecue tool cabinet is an attractive and practical addition to your patio or deck. It is easy to build, requires minimal material, and is light and portable. It is an excellent way to store barbecue accessories, keeping mice, other animals and the elements away from the cooking tools. By removing the feet, the cabinet can be easily altered to hang permanently on a wall or fence.
What You'll Need
Materials
- 5/4 x 6 cedar - 14 feet
- 1 x 6 T & G cedar - 18 feet
- 1" #8 brass screws
- 2" deck screws
- 2 1/2" deck screws
- 1" galvanized finishing nails
- 2" galvanized finishing nails
- outdoor wood glue
- "T" Hinges, galvanized (2 pairs) 2410-251
- pull handle 2406-211
- barrel bolt (2 1/2") 2313-062
- hooks 2375-879
- Wood finish
- fine sandpaper
Tools
- mitre saw 1347-890
- table saw
- drill
- #8 countersink bit 1227-539
- sander
- hammer
- measuring tape 1048-832
- carpenter's square 1070-061 optional tools:
- router (optional) 1258-524
- router bit set (optional)
Here's How
Pre-drill all screw locations with a #8 countersink bit and sand the pieces before assembly.
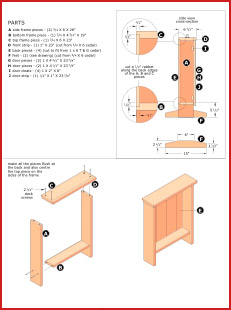
- Referring to the diagram, cut the two side pieces, the top and bottom pieces, and the feet to size. Glue and nail the front strip to the top piece.
- Using a bench saw or router, cut a 1/2" x 1/2" rabbet along the back edges of the side, top and bottom pieces of the frame. (Note that the rabbet on the side pieces only extends to the base of the bottom frame piece.)
- Assemble the frame using 2-1/2" deck screws and exterior wood glue. Make all the pieces flush at the back and centre the top piece on the sides of the frame. Using clamps will help in the assembly process. Check to ensure that the frame is square. A temporary wood strap fastened diagonally to the front of the frame will keep the unit square until the back is installed.
- Cut and assemble 1 x 6 cedar boards for the back, using 2" galvanized finishing nails and glue. The temporary wood strap (step 3) may now be removed.
Build the Doors
- Referring to the schematic diagram, cut the four door pieces to size from 1 x 6 tongue and groove cedar. Cut off the tongue and groove from the inner and outer edges of each door.
- Fasten the two cleats to the back of each door, using glue and 1" #8 brass screws.
- With the cabinet on its back, install the two doors, using two hinges per door. Install the cedar strip to the right side door, using 1" finishing nails and glue.
- Install the barrel bolt, drilling a 1/4" diameter hole half an inch into the top frame piece to line up with the bolt.
- Attach the two wooden feet, using glue and 2" deck screws. Initially insert one screw into each foot, set the cabinet on a level surface, and using a level or carpenter's square check to make sure the unit is vertical. Then secure with three more screws in each foot.
- Install the hooks and handle as shown.
- Finish with a natural UV resistant wood finish.


