
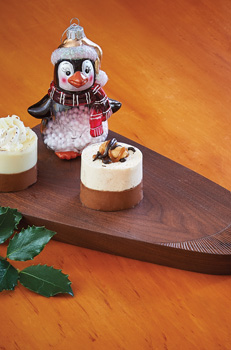
Wood Serving Block
Presentation is everything, and creating your own one-of-a-kind serving block will take the cake this holiday season.
 Wood Serving Block
By Rob Brown
Presentation is everything, and creating your own one-of-a-kind serving block will take the cake this holiday season. Make a series of blocks in various shapes and sizes for entertaining family and friends at home, or as gifts for your favourite hosts. Carve, burn, or stencil a design or monogram for extra personal appeal. There's no limit on the creative possibilities to serve up some love!
Helpful Tips
- Practice on some scrap softwood before reaching for the more expensive, denser species.
- Feel free to adjust the shape of the block to suit your preference and the piece of wood you're using.
What You'll Need
Tools
- jointer
- planer
- band saw or scroll saw
- block plane 1043-123
- rasp file 1122-831
- sander
- sanding block
- scribe compass 1115-626
- carving set
- hardwood blank
- food-safe finish 4548-181
Here's How
- Dress the workpiece down to about 1" thick. Smaller serving blocks can be made from thinner materials.
- Draw the outline of the block on the workpiece. Use a combination of flexible curves, round objects, and freehand sketching.
- Set the angle of your band saw or scroll saw table to 15 degrees and cut the shape, making sure to cut on the proper side of the line.
- Use a block plane, rasp file, and sanding block to fair and smooth the freshly cut outer edge.
- When complete, the lower portion of the angled edge should have a slight radius on it and be smooth enough to apply a finish.
- Sand the top and bottom surfaces of the block, and break the sharp edges.
- Lay out the carved design by using a scribe compass to draw an arc near one end. Next, use a straightedge to draw guidelines radiating from the centre point of the arc, but only beyond the arc.
- Use a V-gouge to carve the straight and rounded grooves. Another option is to use an awl to create a series of small holes or a knife to inscribe a series of shallow cuts. These grooves or holes are only for decoration, so feel free to experiment on some scrap.
- One final light sanding will remove any pencil marks from the wood.
- Apply a food-safe finish. Build coats until you're satisfied.
- Reapply finish when necessary.
| Lots of Options Each serving block can be a different shape. Use a combination of flexible curves, round objects, and freehand sketching to achieve a pleasing shape. | 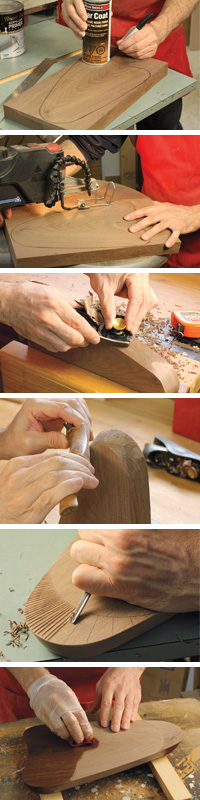 |
| Angled Edge The overall shape of the serving block can be cut with either a scroll saw or band saw. Tilt the table to 15 degrees and cut out the block shape. | |
| Fair, Smooth Edges A block plane will help fair the straighter edge sections, while the rasp file and sander will assist with the curved portions. A smooth, even feel is what you're after. | |
| Lighten the Look With the edge smooth you can add a slight round to it with some hand tools. Removing more material near the bottom of the serving block gives it a nicer, lighter look. | |
| Add a Focal Point After laying out the design, use a tool to add an aesthetically pleasing design to a portion of the surface. This is strictly for looks so experiment with different tools, techniques, and shapes. | |
| Food Safe Finish Food will come in contact with the finish so you need to ensure it is food safe. Experiment with scrap because the finish will have a different look on different wood. |
Rob Brown designs and builds custom furniture and is editor of Canadian Woodworking and Home Improvement magazine.
www.canadianwoodworking.com


