Deck Side Table
This small and attractive side table is perfect for holding drinks, hors d'oeuvres or the latest novel.
 This small and attractive side table is perfect for holding drinks, hors d'oeuvres or the latest novel. Part of the tabletop is sectioned off to hold beverage glasses in place. Its size and weight make it very portable, virtually a tray with legs. Constructed from attractive and durable cedar, this table is the perfect height to accompany a Muskoka or deck chair.
What You'll Need
Tools
- mitre saw 1347-890
- table saw
- hammer
- measuring tape 1048-299
- nail punch 1134-793
- carpenter's square 1070-060
- drill 1239-220
- screwsetter bit 1227-539
Materials
- fine sandpaper
- 5/4" x 6" cedar (12')
- 1" x 6" cedar (16')
- 1" x 1" nailing strips (3')
- outdoor wood glue 2020-041/042
- 11/2" deck screws
- 2" deck screws 2182-405
- 11/2" galvanized finishing nails 2134-078
- wood sealer/finish
Parts
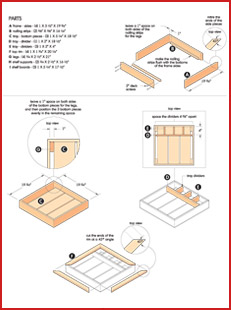
- frame - sides - (4) 1 x 31/2" x 193/4"
- nailing strips - (2) 5/8" x 5/8" x 161/4"
- tray - bottom pieces - (3) 1 x 51/4" x 181/2"
- tray - divider - (1) 1 x 2" x 181/2"
- tray - dividers - (3) 1 x 2" x 4"
- top rim - (4) 1 x 13/4" x 201/4"
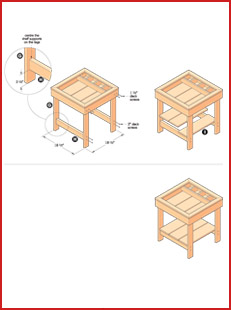
- legs - (4) 5/4 x 21/2" x 21"
- shelf supports - (2) 5/4 x 21/2" x 161/2"
- shelf boards - (3) 1 x 51/4" x 171/2"


Here's How
Sand all the pieces for this project before assembly, and pre-drill all screw locations with a screwsetter bit.
- First build the tray section. Refer to the schematics, and cut the side, bottom, rim, and divider pieces for the tray to size. The sides of the tray are cut from 1" x 6" cedar and are mitred at the corners. The rim and dividers are also cut from 1" x 6" cedar.
- Assemble the four pieces using outdoor wood glue and 2" deck screws. Use a carpenter's square to ensure that the corners are square. A temporary strap fastened diagonally on the frame will keep it square until the tray bottom is installed.
- Fasten the two 1" x 1" nailing strips to the inner part of the frame using 11/2" galvanized finishing nails and outdoor wood glue.
- Install the three bottom pieces of the tray leaving enough room for the legs to be inserted later through the bottom of the tray to the underside of the top rim. Install the divider pieces using 1/2" galvanized finishing nails.
- Refer to the schematic, and cut the four legs and bottom shelf supports from 5/4" x 6" cedar. Cut the three bottom shelf pieces from 1" x 6" cedar.
- Install the four legs through the shelf of the top tray section up to the underside of the rim. Use outdoor wood glue and 11/2" deck screws. During installation, use a carpenter's square to ensure that the legs are vertical to the top tray.
- Install the two bottom shelf supports using glue and 2" deck screws.
- Attach the three shelf pieces using 11/2" galvanized finishing nails, spacing them evenly across the shelf supports.
- Seal and finish all wood surfaces of the project.


