Multi-task furniture
 Multi-task furniture
by Ralph Swan
I enjoy finding ideas that can stand the test of time. This project was inspired by an early 1900s, not-for-sale display piece I came across in an antique market in Barrie, Ontario. Since purchasing the item was not an option, I took the opportunity to create my own contemporary, sleeker version. I envisioned this piece of furniture finished in the new Minwax® Polyshades Espresso Satin colour, trimmed with brushed aluminum hardware. With my smartphone, a borrowed yardstick from a nearby display, and pen and paper, I captured dimensional details and a rough drawing of the general construction.
My next step was to refine my drawings and create a material list of lumber and hardware before visiting my local Home Hardware Building Centre. The lumber selection of different species gave me many options. I decided to go with laminated pine for the tabletop (or shelves in the other positions), and 1" x 3" maple for the base. For me, walking around the store looking at all the different hardware and imagining how it can be used makes me appreciate the variety. After selecting hinges, screws, corner brackets, dowels, glue, flat and angle aluminum bar stock, and finishing supplies, I was ready to get building my project.
 I find that the success of any great project lies in having a good plan and knowing what to expect from the tools and materials. Remember to always test tools for results by using a scrap piece or off-cut to ensure they are set to cut or shape properly. Create a large sample colour board to practice your finishing technique, and to ensure the colour selection is right for the project. This builds confidence to complete the project with a clear expectation of results.
Hopefully you are as inspired as I was, and you'll enjoy building this versatile piece of furniture for your home.
That's the finish
Ralph Swan
Ralph Swan is a wood care expert from Minwax® and a frequent contributor to Home at Home magazine.
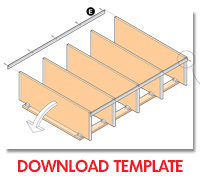
Clevis pins can be removed easily without tools, allowing the unit to pivot into tiered display shelves or a vertical bookcase. Simply align the pre-drilled holes and secure into position with the clevis pins.


What you'll need
 Tools
Tools - table saw 1346-685
- mitre saw 1347-574
- band saw 1345-341 or jig saw 1268-667
- jigsaw blades 1217-000
- hacksaw 1128-185
- metal file 1121-583
- pocket hole Jig 1261-726 or
- dowel jig and dowels 1210-184
- router 1258-514
- router bits
- wood chisel 1020-326
- hammer 1030-271
- random orbit or 1/4" sheet sander 1262-171
- drill
- drill bits 1245-479
- 3/8" countersink drill bit 1227-149
- sandpaper 1060-194
- glue 2020-306
- paint thinner 1620-650
- tack cloth 4532-492
- hinges (5 pairs) 2359-638
- 3" corner braces (4) 2379-107
- 6" mending plates (8) 2379-820
- #8 x 11/4" zinc flat head screws (1 pk) 2173-560
- #6 x 5/8" zinc flat head screws (1 pk) 2174-097
- aluminum flat bar 1/8" x 11/2" x 8' (2)
- aluminum angle 3/4" x 3/4" x 3/32" x 8' (2) 2193-227
- clevis pins 5228-087
- pine shelf 3/4" x 12" x 36" (5) 2546-591
- maple moulding 3/4" x 21/2" x 72" (8)
- Polyshades Espresso Satin 1872-968
- Rustoleum Metallic Spray Paint
- Angle brush 1612-245
Here's How
Tabletop
- Trim 12" boards for tabletop/shelves to size.
- Cut aluminum angle to match the depth of the shelves (approx. 12").
- Dado out bottom sides of each shelf for aluminum angles.
- Pre-drill and countersink holes in bottoms of angle pieces and install onto shelves.
- Lay the shelves out, side by side, on top of the two rear 3/4" x 21/2" braces.
- Mark positions of hinges, and recess into bottoms of shelves and rear braces.
- Pre-drill and countersink holes in flat aluminum bar for pivot at front edges of each shelf.
- Assemble tabletop, and test pivoting action of shelves.
Table Base
- Using 3/4" x 21/2" maple, cut radius corners on the top and bottom horizontal side supports.
- Cut verticals to length and assemble to horizontal side supports using pocket hole screws or dowels and glue.
- Shoes of side frames are cut from 3/4" x 21/2" maple. Router all top edges of shoes to create a profile.
- Cut base braces to length and assemble base.
- Attach base to underside of the tabletop/shelf assembly using corner braces and mending plates for spacers.