Nesting Instincts
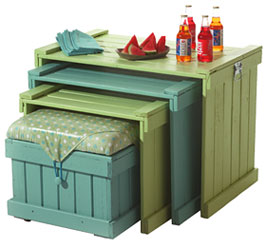
Outdoor nesting tables are great space savers that allow design flexibility. Tuck an ottoman under the smallest table and you'll be decked out in style.
When it comes to outdoor entertaining, I always seem to have adequate seating for my guests but never enough tables for the food and drinks.The solution is outdoor nesting tables, great space savers that allow design flexibility as needed. Tuck an ottoman under the smallest table and you'll be decked out in style!


What You'll Need
Materials
- 1" x 4" x 8' spruce (14)
- 1" x 3" x 8' spruce (4)
- chest handles 5415-259
- furniture glides 2348-597
- 1-1/4" finishing nails 2134-425
- 2-1/2" galvanized finishing nails (or you can use 1-1/2" and 2-1/2" wood screws 2174-346/596)
- 1 tube construction adhesive 2037-385
- Wood Shield solid stain 1868
Tools
- Stanley Fat MaxT hand saw 1063-253
- Benchmark hammers 1030-308/558
- Auto Advance Retract-A-Bit 1058-686
- belt sander
- sandpaper
- caulking guns 2034-022/023/024/025/035/060/079/088/113/122/124
- Utility knife 1034-302
- Multi-function level 1036-052
Here's How
Plan Your Cuts To Make Full Use Of Your Lumber:
Small table: 6 pieces of 1" x 4" cut to 22-1/2" (top); 12 pieces of 1" x 4" cut to 18" (sides); 6 pieces 1" x 3" cut to 20" (for the joints)
- Lay out the six top pieces and apply a bead of construction adhesive to the end. Nail a 1" x 3" joint piece flush to the end.
- Lay out the six side pieces and apply adhesive. Nail the joint piece to the bottom of the side. Repeat for other side.
- Place the sides under and flush to the top and nail with the 2-1/2" nails. (Ensure the sides are straight.)
- Apply adhesive to the top side edge and nail the joint piece in place flush with top edge.
- Attach chest handles to the sides and glides to the bottom of each table. (Glides will prevent water from wicking up the sides of the tables and extend the life of the stain coating.)
- Stain to suit your outside décor. In our project, we used Wood Shield solid in water-inspired colours 5N1-4 and 3K3-5.
Mid-sized table: 6 pieces 1" x 4" cut to 26-1/2" (top), 12 pieces 1" x 4" cut to 20-1/2" (sides), 6 pieces 1" x 3" cut to 20" (joints).
Large table: 6 pieces 1" x 4" cut to 30-1/2" (top), 12 pieces 1" x 4" cut to 23" (sides), 6 pieces 1" x 3" cut to 20" (joints). Follow the same assembly instructions provided above.


